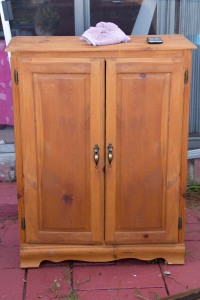
About a year ago we were given this cupboard. It was exactly what we had been looking for to store the shoes that always seem to pile up next to the front door. It truly was a heaven sent as we had not, up to that point, found something big enough to suit our needs. I was also very adamant that we needed something that had doors so that when my two and three year old were putting their shoes away, I wouldn’t have to go back and straighten what looked messy, because no one could see it.
I have been saying for about a year now that I needed to re-stain it as I am not a fan of the color. I have been putting it off because it was something I had never done before, and then it got too hot outside, and then I got busy, and then I came up with more excuses, and.. well you get the picture. The problem is that we will be moving in November and I will lose the back yard; making working on furniture a whole lot harder.
So, I finally got off my tushy and did it.
The first step was to go on youtube, HGTV website and other peoples blogs to learn how to do this. I had a pretty good idea, but I wanted to make sure I was ready for what ever happened. In that the cupboard had be previously stained, but not finished, I didn’t have to sand it unless I thought the previous color would inter fear with what I wanted. I was making it darker so I didn’t feel it would be a problem.
I chose RUST-OLEUM wood stain in Kona(an espresso brown color). In the spirit of full disclosure I will say that I know very little about wood stain brands and quality and I admit I chose this brand because the can looked more appealing than the other ones at the hardware store… and, according to the label, it is the Trusted Quality since 1921. So, I can’t go wrong. 
I got the Cabot Polyurethane because the other brand was all out of the Satin finish.(Satin meaning only slightly glossy)I got a spongy paint brush for the stain, a regular paint brush for the finish and an old towel and I was ready to start.
I removed all the shelves and the doors so I could work on them individually. Then it really was as simple as they said it was on the video. I painted on the stain with the sponge brush, waited 5 minutes and then wiped it with the old towel always in the same direction as the grain of the wood.
I let is sit for a few hours. Then I did the finish. The finish I did just as if I were painting it and once again in the same direction as the grain of the wood. Then I had to let it sit outside for three days to air out. I was watching the weather like crazy because it is rainy season here in Florida right now, but I was lucky and didn’t get rained out. When the smell was pretty much gone, I put the doors and shelves back on and brought it in the house.
The video made it look like such a clean and easy job. It was easy. It was NOT clean. Next time I am using gloves; that stuff got all over my hands and arms and was a pain to get off. It might have been easier if I had a paint cleaner, but all I had was nail polish remover.
I am glad it was so simple because I have a table and chairs I need to do as well, but I have to sand them down first so it may be a while before I post them.


I was WAY behind on your blog… so I am reading all of these posts I missed, which really just makes me miss you more. I LOVE this cabinet. And I LOVE that you chose the stain based on the label because that’s exactly what I would have done. Anyway, so excited you are moving closer to me!!!
staining is fun, but painting is AWESOME!!! You should do something crazy with your next project and do a really fun color. It looks great!
beauty
Lovely. Can’t wait until I have a little space to stain some furniture pieces that need updating.